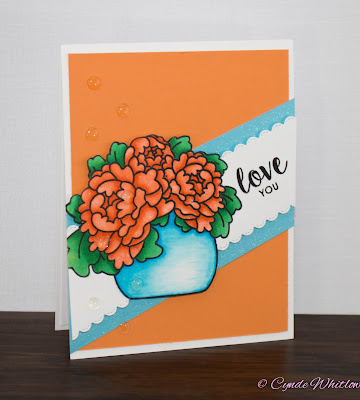
I'm back today to share another card with you all! I've done loads of Copic coloring lately and today's card is no different, but I wanted to try some new (to me) as well.
If you're interested in any of the products I've used, I have links (some affiliate links) throughout and at the end of the post. Click here to read my full disclosure policy.
I think Altenew has some of the most amazing flowers on the market. Their design and versatility is ah-mazing. The Majestic Blooms Stamp set by Altenew is actually a multi-layer set, but I climb on the struggle bus every time I attempt this kind of stamping, so I decided to stick with what I'm comfy with and simply use the outline of the flower and color it in with Copic's.
Since, I'm going to color this in with Copic's and I don't want them to bleed through the inside of my card I stamped the flower and leaves on a piece of Neenah White Cardstock with Simon Says Stamp Intense Black Ink. This technically no longer makes it a one layer card, but this is what we'll call it anyway.
I went with pretty dark and bold colors (see thumbnail links below), because the leaves had quite a bit of black in them already.
After I was done coloring in the images with Copic's, I went over them again reinforcing the highlights and shadows with my Irojiten Color Dictionary Colored Pencils.
Okey dokey. To create the scallop border, I used one of the Lawn Fawn Stitched Scallop Border Dies and made a stencil out of some Grafix Clear Craft Plastic. You could use scrap paper, masking paper, chipboard or whatever floats your boat. I prefer using clear plastic for a couple of reasons. It's perfectly reusable, the thickness of this particular plastic is perfect for tracing along the edges aaannnd it's clear. I can move it around wherever I like and I can see thought to my panel.
Using a Copic Multiliner, I placed by Scallop Stencil on my panel and carefully traced around the edges. I also added some faux stitching for more interest. I then went back with grey Copic's and added some more shadow and color to make it look like a separate piece underneath the flower and leaves.
To finish off my card, I added a few dots with a Sakura Black Glaze Pen and some Spectrum Noir Clear Sparkler Pen to just the highlight of the images.
That's it! Easy peasy.
I also have a card on the Kennedy Grace Creations Blog today folks! It features the new Time To Bloom Stamp Set. Be sure to stop by and check that out!
Thanks so much for stopping to see me here and as always I hope you enjoyed my card today!
Until next time!
Masking Clearly Besotted + Copic Coloring
Making An Easy One Layered Card - Featuring Avery Elle and Copic Coloring
One Layered Card - Featuring Kennedy Grace Creations: Time To Blossom
InLinkz Project Manager account expired


Im blowen away with the beauty of this card and even though I dont have this particular stamp would love to try this layout with a different one. My goodness you are so talented I love visiting
ReplyDeleteAww...Thank you so much! If you give it a try, be sure to share it with me! :)
DeleteWOW Cynde, these are gorgeous, especially the blue one!
ReplyDeleteThank you! :)
DeleteGorgeous!! And informative!
ReplyDeleteThank you!! :)
DeleteYour coloring is absolutley MAJESTIC!
ReplyDeleteThank you so much! :)
DeleteLove ,love, your cards. It was nice meeting you the other day. I would love to be able to color like that. It was so nice of you to share your knowledge of card making with us. You are awesome
DeleteThank you Carol! It was a blast visiting with you Ladies!! I look forward to chatting with you all again someday!
Delete